

1. ESP8266 là gì?
ESP8266 là một vi điều khiển tích hợp Wi-Fi được sản xuất bởi Espressif Systems, được sử dụng phổ biến trong các dự án Internet of Things (IoT). Đây là một module giá rẻ, dễ lập trình và tích hợp khả năng kết nối Wi-Fi, cho phép các thiết bị có thể giao tiếp với mạng Internet hoặc điều khiển từ xa thông qua mạng không dây.
2. Cách tạo WebServer với ESP8266
Hướng dẫn này trình bày hai phương pháp khác nhau để xây dựng WebServer với ESP8266
- Cách 1: Tạo máy chủ web bằng Arduino IDE
- Cách 2: Tạo máy chủ web bằng phần mềm NodeMCU
Cách 1: TẠO MÁY CHỦ WEB BẰNG ARDUINO IDE
Bước 1: Tải xuống và cài đặt Arduino IDE trên hệ điều hành của bạn (một số phiên bản cũ hơn sẽ không hoạt động).
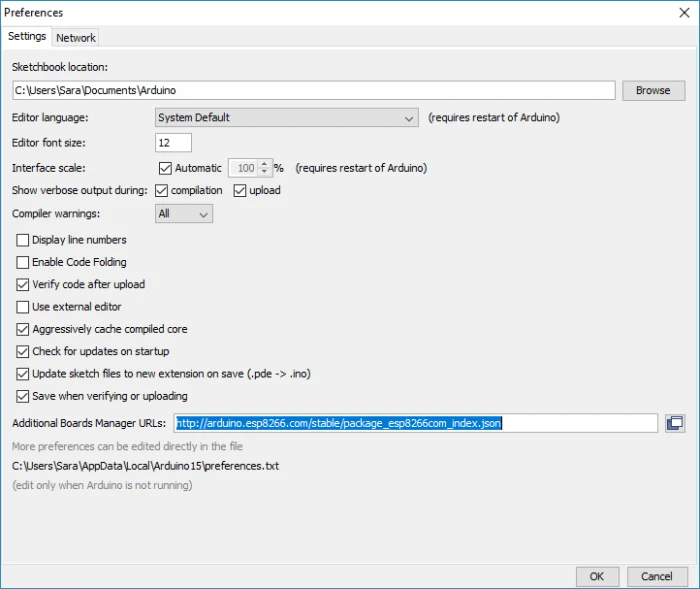
Bước 2: Sau đó, bạn cần cài đặt tiện ích bổ sung ESP8266 cho Arduino IDE. Để thực hiện, hãy vào File > Preferences .
Bước 3: Nhập http://arduino.esp8266.com/stable/package_esp8266com_index.json vào trường “ Additional Board Manager URLs ” như trong hình bên dưới. Sau đó, nhấp vào nút “OK”.
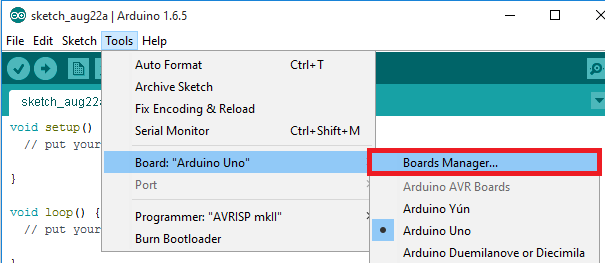
Bước 4: Vào Công cụ > Bảng > Trình quản lý bảng …
Cuộn xuống, chọn menu bo mạch ESP8266 và cài đặt “e sp8266 by ESP8266 Community ”, như hình minh họa bên dưới.
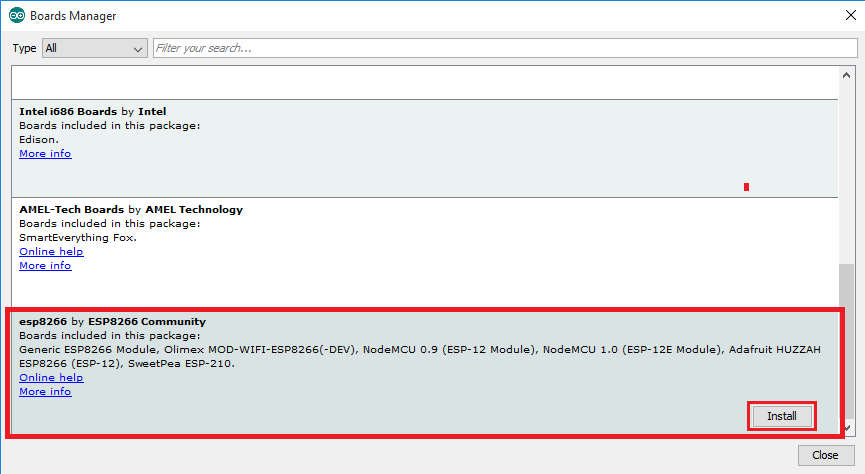
Vào Tools > Board và chọn board ESP8266 của bạn. Sau đó, mở lại Arduino IDE.
Bước 5: Sao chép mã sau vào Arduino IDE của bạn:
/*********
  Rui Santos
  Complete project details at https://randomnerdtutorials.com
*********/

// Load Wi-Fi library
#include <ESP8266WiFi.h>

// Replace with your network credentials
const char* ssid     = "REPLACE_WITH_YOUR_SSID";
const char* password = "REPLACE_WITH_YOUR_PASSWORD";

// Set web server port number to 80
WiFiServer server(80);

// Variable to store the HTTP request
String header;

// Auxiliar variables to store the current output state
String output5State = "off";
String output4State = "off";

// Assign output variables to GPIO pins
const int output5 = 5;
const int output4 = 4;

// Current time
unsigned long currentTime = millis();
// Previous time
unsigned long previousTime = 0;
// Define timeout time in milliseconds (example: 2000ms = 2s)
const long timeoutTime = 2000;

void setup() {
  Serial.begin(115200);
  // Initialize the output variables as outputs
  pinMode(output5, OUTPUT);
  pinMode(output4, OUTPUT);
  // Set outputs to LOW
  digitalWrite(output5, LOW);
  digitalWrite(output4, LOW);

  // Connect to Wi-Fi network with SSID and password
  Serial.print("Connecting to ");
  Serial.println(ssid);
  WiFi.begin(ssid, password);
  while (WiFi.status() != WL_CONNECTED) {
    delay(500);
    Serial.print(".");
  }
  // Print local IP address and start web server
  Serial.println("");
  Serial.println("WiFi connected.");
  Serial.println("IP address: ");
  Serial.println(WiFi.localIP());
  server.begin();
}

void loop(){
  WiFiClient client = server.available();   // Listen for incoming clients

  if (client) {                             // If a new client connects,
    Serial.println("New Client.");          // print a message out in the serial port
    String currentLine = "";                // make a String to hold incoming data from the client
    currentTime = millis();
    previousTime = currentTime;
    while (client.connected() && currentTime - previousTime <= timeoutTime) { // loop while the client's connected
      currentTime = millis();
      if (client.available()) {             // if there's bytes to read from the client,
        char c = client.read();             // read a byte, then
        Serial.write(c);                    // print it out the serial monitor
        header += c;
        if (c == '\n') {                    // if the byte is a newline character
          // if the current line is blank, you got two newline characters in a row.
          // that's the end of the client HTTP request, so send a response:
          if (currentLine.length() == 0) {
            // HTTP headers always start with a response code (e.g. HTTP/1.1 200 OK)
            // and a content-type so the client knows what's coming, then a blank line:
            client.println("HTTP/1.1 200 OK");
            client.println("Content-type:text/html");
            client.println("Connection: close");
            client.println();

            // turns the GPIOs on and off
            if (header.indexOf("GET /5/on") >= 0) {
              Serial.println("GPIO 5 on");
              output5State = "on";
              digitalWrite(output5, HIGH);
            } else if (header.indexOf("GET /5/off") >= 0) {
              Serial.println("GPIO 5 off");
              output5State = "off";
              digitalWrite(output5, LOW);
            } else if (header.indexOf("GET /4/on") >= 0) {
              Serial.println("GPIO 4 on");
              output4State = "on";
              digitalWrite(output4, HIGH);
            } else if (header.indexOf("GET /4/off") >= 0) {
              Serial.println("GPIO 4 off");
              output4State = "off";
              digitalWrite(output4, LOW);
            }

            // Display the HTML web page
            client.println("<!DOCTYPE html><html>");
            client.println("<head><meta name=\"viewport\" content=\"width=device-width, initial-scale=1\">");
            client.println("<link rel=\"icon\" href=\"data:,\">");
            // CSS to style the on/off buttons
            // Feel free to change the background-color and font-size attributes to fit your preferences
            client.println("<style>html { font-family: Helvetica; display: inline-block; margin: 0px auto; text-align: center;}");
            client.println(".button { background-color: #195B6A; border: none; color: white; padding: 16px 40px;");
            client.println("text-decoration: none; font-size: 30px; margin: 2px; cursor: pointer;}");
            client.println(".button2 {background-color: #77878A;}</style></head>");

            // Web Page Heading
            client.println("<body><h1>ESP8266 Web Server</h1>");

            // Display current state, and ON/OFF buttons for GPIO 5
            client.println("<p>GPIO 5 - State " + output5State + "</p>");
            // If the output5State is off, it displays the ON button
            if (output5State=="off") {
              client.println("<p><a href=\"/5/on\"><button class=\"button\">ON</button></a></p>");
            } else {
              client.println("<p><a href=\"/5/off\"><button class=\"button button2\">OFF</button></a></p>");
            }

            // Display current state, and ON/OFF buttons for GPIO 4
            client.println("<p>GPIO 4 - State " + output4State + "</p>");
            // If the output4State is off, it displays the ON button
            if (output4State=="off") {
              client.println("<p><a href=\"/4/on\"><button class=\"button\">ON</button></a></p>");
            } else {
              client.println("<p><a href=\"/4/off\"><button class=\"button button2\">OFF</button></a></p>");
            }
            client.println("</body></html>");

            // The HTTP response ends with another blank line
            client.println();
            // Break out of the while loop
            break;
          } else { // if you got a newline, then clear currentLine
            currentLine = "";
          }
        } else if (c != '\r') {  // if you got anything else but a carriage return character,
          currentLine += c;      // add it to the end of the currentLine
        }
      }
    }
    // Clear the header variable
    header = "";
    // Close the connection
    client.stop();
    Serial.println("Client disconnected.");
    Serial.println("");
  }
}
Bạn cần sửa đổi hai biến sau bằng thông tin đăng nhập mạng của mình để ESP8266 có thể thiết lập kết nối với bộ định tuyến.
// Replace with your network credentials
const char* ssid = “”;
const char* password = “”;
Bước 6:
Nếu bạn đang sử dụng ESP-12E NodeMCU Kit, việc tải lên bản phác thảo rất đơn giản vì nó có bộ lập trình tích hợp. Cắm bo mạch của bạn vào máy tính. Đảm bảo bạn đã chọn đúng bo mạch và cổng COM.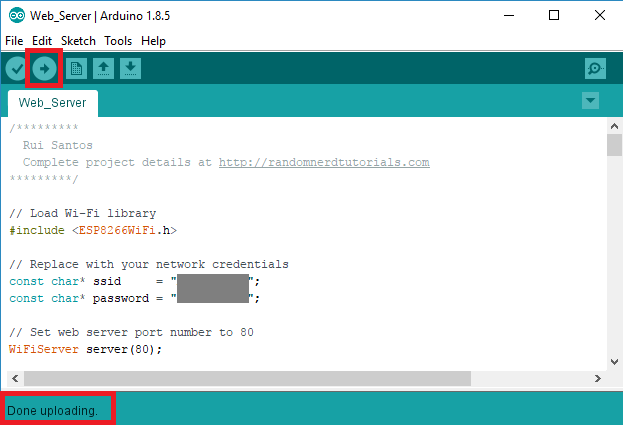
Sau đó, nhấp vào nút Tải lên trong Arduino IDE và đợi vài giây cho đến khi bạn thấy thông báo “Đã tải lên xong” ở góc dưới bên trái.
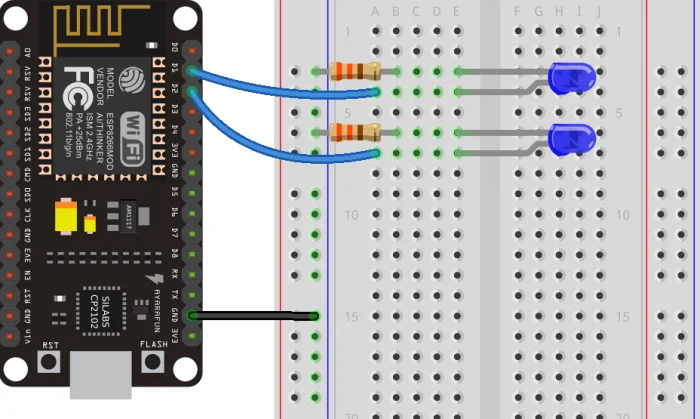
Bước 7: Kết nối hai đèn LED với ESP8266 của bạn như thể hiện trong sơ đồ sau – với một đèn LED được kết nối vớiGPIO 4(D2), và một cái khác để GPIO 5(D1).
Bước 8: Kiểm tra máy chủ Web Server?
Tìm địa chỉ IP ESP: Nhấn nút ESP8266 RESET và nó sẽ xuất địa chỉ IP ESP trên Serial Monitor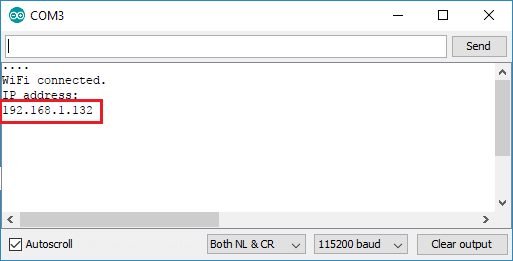
Sao chép địa chỉ IP đó vì bạn cần nó để truy cập vào máy chủ web.
Bước 9: Truy cập vào máy chủ Web?
Mở trình duyệt của bạn, nhập địa chỉ IP ESP và bạn sẽ thấy trang sau. Trang này được ESP8266 gửi khi bạn thực hiện yêu cầu trên địa chỉ IP ESP.
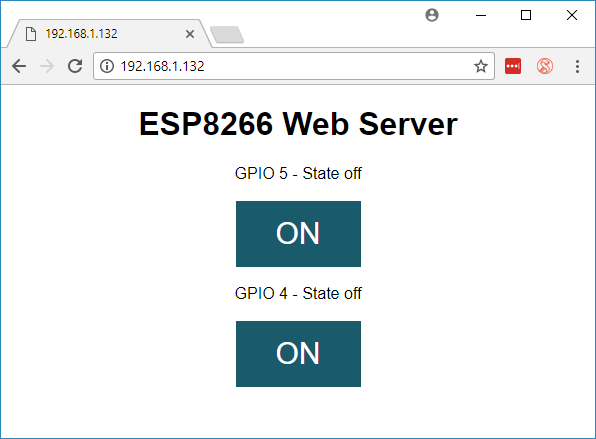
Nhấp vào GPIO 5 ON 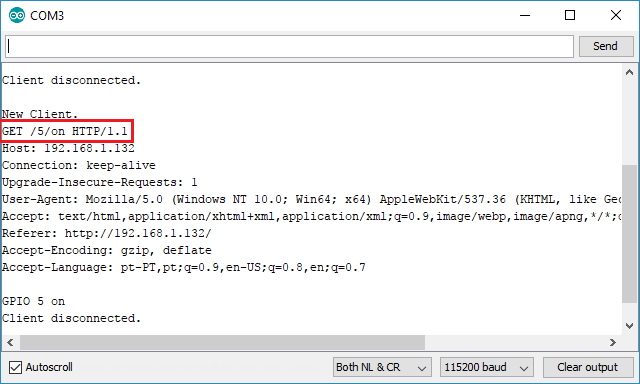
Trạng thái đèn LED cũng được cập nhật trên trang web.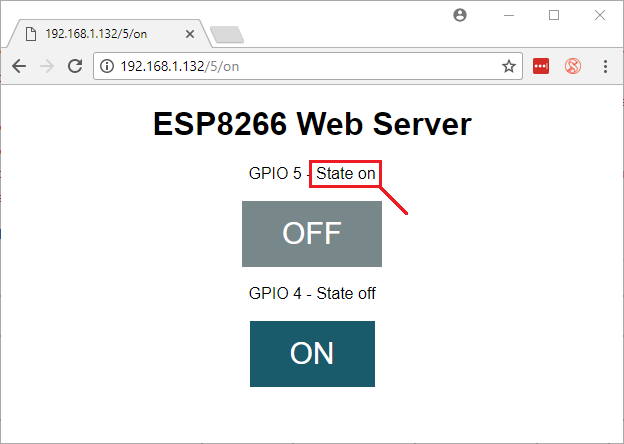
Cách 2: TẠO MÁY CHỦ WEB BẰNG FIRMWARE NODEMCU
Bước 1:
- Tải xuống ESPlorer
- Giải nén thư mục đó
- Đi tới thư mục dist (đây là đường dẫn: ESPlorer-master\ESPlorer\dist)
- Chạy ESPlorer.jar . Đây là chương trình JAVA, vì vậy bạn cần cài đặt JAVA trên máy tính của mình.
- Mở ESPlorer
Bạn sẽ thấy một cửa sổ tương tự, làm theo các hướng dẫn sau để tải lên tệp LUA:
- Kết nối bộ lập trình FTDI của bạn với máy tính
- Chọn cổng lập trình FTDI của bạn
- Nhấn Mở/Đóng
- Chọn tab NodeMCU+MicroPtyhon
- Tạo một tập tin mới có tên là init.lua
- Nhấn Lưu vào ESP

Bước 2: Tải mã sau bằng phần mềm trước đó:
wifi.setmode(wifi.STATION)
wifi.sta.config("YOUR_NETWORK_NAME","YOUR_NETWORK_PASSWORD")
print(wifi.sta.getip())
led1 = 3
led2 = 4
gpio.mode(led1, gpio.OUTPUT)
gpio.mode(led2, gpio.OUTPUT)
srv=net.createServer(net.TCP)
srv:listen(80,function(conn)
conn:on("receive", function(client,request)
local buf = "";
local _, _, method, path, vars = string.find(request, "([A-Z]+) (.+)?(.+) HTTP");
if(method == nil)then
_, _, method, path = string.find(request, "([A-Z]+) (.+) HTTP");
end
local _GET = {}
if (vars ~= nil)then
for k, v in string.gmatch(vars, "(%w+)=(%w+)&*") do
_GET[k] = v
end
end
buf = buf.."<h1> ESP8266 Web Server</h1>";
buf = buf.."<p>GPIO0 <a href=\"?pin=ON1\"><button>ON</button></a> <a href=\"?pin=OFF1\"><button>OFF</button></a></p>";
buf = buf.."<p>GPIO2 <a href=\"?pin=ON2\"><button>ON</button></a> <a href=\"?pin=OFF2\"><button>OFF</button></a></p>";
local _on,_off = "",""
if(_GET.pin == "ON1")then
gpio.write(led1, gpio.HIGH);
elseif(_GET.pin == "OFF1")then
gpio.write(led1, gpio.LOW);
elseif(_GET.pin == "ON2")then
gpio.write(led2, gpio.HIGH);
elseif(_GET.pin == "OFF2")then
gpio.write(led2, gpio.LOW);
end
client:send(buf);
client:close();
collectgarbage();
end)
end)Bước 3: Truy cập vào máy chủ web của bạn
Khi ESP8266 của bạn khởi động lại, nó sẽ in địa chỉ IP của ESP8266 vào màn hình nối tiếp của bạn. Nếu bạn nhập địa chỉ IP ESP8266 vào trình duyệt web, bạn có thể truy cập vào máy chủ web của mình.
>> Tham khảo về cloud server để chạy website
Leave a Reply